GitHubの algolia / unified-instantsearch-ecommerce にありますように、AlgoliaでEコマース向けの新しいプロジェクトがはじまっています。
このプロジェクトは👆のように、EコマースのWebサイトに最速でAlgoliaのソリューションを導入するためのものです。
私も 自分のブログにAlgolia検索を導入して思ったのですが、InstantSearchのそれぞれのコンポーネントをイイ感じに使うって、それなりにフロントエンド側の技術を持ったエンジニアがいないと、そこまで容易じゃないかもしれない、と。(逆に普段モダンなフロントエンドの開発をしている人にとっては超楽チンじゃんって感じなのかもしれませんが…)
ということで、まだ実験的な機能になりますが、サクッと2020年5月15日現在でドキュメントに書かれている内容をみていきましょう。
Unified InstantSearchのWiki
https://github.com/algolia/unified-instantsearch-ecommerce/wiki に情報がまとまっているので、コチラを参考に記載していきます。
Project概要
Unified InstantSearch E-Commerceを導入する上で必要なことを紹介。
技術スタック
Unified InstantSearch E-Commerceは全てJavaScriptで書かれているプロジェクトで、Preact(Reactの軽量な代替版的なもの)で出来ている。ということで、コンポーネントはReactで書かれていてJSXとReack Hooksを使っている。
検索部分においてはReact InstantSearchを利用。
スタイルに関しては、SassというCSSのスーパーセット/プリプロセッサーを使っている。
PreactやReactがWebサイトで使われている必要はなく、Unified InstantSearch E-Commerceはself-containedで必要なものだけをインポートすれば良い形になるので、例えばVueやAngularまたは、何もフロントエンドのライブラリを使っていない場合も動作する
ファイルの構造
Unified InstantSearchを使う人が考慮しなければいけないファイルは全てsrc配下に置かれている。
Configuration
設定系のファイルはsrc/config配下にあり、ここのファイルだけ編集が必要になると言える。
src/config/index.jsでプロジェクトを仕立てることができますが、詳細は設定オプションページで。
Component
プロジェクトとしてのエントリーポイントはsrc/index.jsでルーティングやレンダー周りはsrc/App.jsを参照のこと。
全てのReactコンポーネントはsrc/components/配下。それぞれのカスタムコンポーネントはSassで書かれていますが、UIをカスタマイズしたい場合は検索UIカスタマイズのページで。
Style
スタイルはレイヤ分けされている。
- Styling resets、.uni-Containerセレクタにスコープ
- Application-level styles、Unified InstantSearch E-Commerceのエレメント用
- Theme、React InstantSearchウィジェット用
- Component-specific styles
JavaScriptのファイルはdependenciesとしてスタイルシートをインポートする。カスタムコンポーネントは関連するスタイルシートをインポートするので、カスタムコンポーネントを使わないのであれば、使わないCSSをインポートする必要はない。
スタイルの調整に関しては adjusting styles で。
1. Getting Started
Unified InstantSearch E-Commerceを使う流れは以下。
- データをAlgoliaに登録する(Facet用のデータ・フォーマットはコチラ)
- GitHubレポジトリをfork
- src/config/index.js を編集
- npm run export もしくは yarn export コマンドでJSとCSSファイルをビルド
- 生成されたファイルをフロントエンドにデプロイして利用開始!
事前準備
- GitHubアカウントを作る
- Node.js 12.xをインストールする
Yarnを推奨しているが、どちらでも。ただし、一度どちらかを選択したらそれを使い続けるのをおすすめ。
プロジェクトのFork
Unified InstantSearchは進行中のプロダクトなので、Zipのアーカイブをダウンロードするよりもforkして最新のものを使っていただくことをおすすめ。
forkできたら👇のようにupstreamに追従するように。
git remote add upstream https://github.com/algolia/ecomm-unified.git
依存関係のあるものをインストールするにはyarnかnpm installで
yarn # or `npm install`
プロジェクトをローカルで動かす
カスタマイズした内容をローカルで確認するには以下のコマンドを使用。
yarn start # or `npm run start`
ローカル環境でプロダクション条件下でのプレビューを行う
startコマンドを使ってプロジェクトをローカルで動かす際に、デバッグ等の便利なツールも同時に稼働することになるため、パフォーマンスに影響を与える可能性があります。ローカルで検証を行う際にこの影響を避けるために、最終的な動作環境下で検証を行えるよう preview というコマンドが用意されている。
yarn preview # or `npm run preview`
npx serve -p 5000 preview
open http://localhost:5000
プロジェクトのエクスポート
プロダクション環境にデプロイする用のファイルを作成。
yarn export # or `npm run export`
生成されたsearch.jsとsearch.cssファイルをデプロイ。
プロジェクトのアップデート
forkしたGitHubのリポジトリから最新版を取り込む方法。
git fetch upstream
git checkout master
git merge upstream/master
変更を加えた場合はテストを行うこと。AlgoliaではSemantic Versioning規約に沿ってバージョニングをしていてそれぞれのリリースにタグ付けしている。フォークへの動機を行う前に互換性の精査することをおすすめ。
ブラウザのサポート
サポートするブラウザに関しては、Chrome, Edge, Firefox, Safariにおける最新の2バージョン。IE11をサポートするには、polyfill.ioを使うことをおすすめ。その際は👇を。
<script src="https://polyfill.io/v3/polyfill.min.js?features=default,Array.prototype.find,Array.prototype.includes,Promise,Object.assign,Object.entries,Object.values,IntersectionObserver"></script>
コマンド
カスタマイズやビルドを行うのに便利なコマンド群がある。
| Command Name | Comments |
|---|---|
start | Run the project in development mode, within a fake e-commerce website. |
preview | Build the project for previewing in the context of a fake e-commerce website. |
export | Export the production JavaScript file to include in your website. |
lint | Look for linting issues (useful when customizing the project). |
lint:js | Look for linting issues in the JavaScript code. |
lint:css | Look for linting issues in the CSS/Sass code. |
2. 設定オプション
各設定オプションは以下。
- appID
string | required
AlgoliaのApplication ID
- apiKey
string | required
AlgoliaのSearch-Only API keyを利用すること
- index
object | required
Algoliaのインデックス設定:
| Key | Type | Description |
|---|---|---|
indexName | string | Your Algolia index name. |
searchParameters | SearchParameters | The search parameters to use. |
suggestionsIndex
AlgoliaのQuery Suggestionインデックスの設定:
| Key | Type | Description |
|---|---|---|
indexName | string | Your Algolia index name. |
searchParameters | SearchParameters | The search parameters to use. |
Query Suggestionsは検索ボックスの下や検索結果無しページに表示するもの。Query Suggestionsが使えるプランになっているかAlgoliaのプランをご確認ください。
- inputContainer
string | HTMLElement | required
検索ボタンをDOMにインジェクトする際のCSS selector もしくは HTML element。(inputタグはUnified InstantSearchによって生成される。div等を使ってください)
- inputContent
string | ReactNode | required
検索ボタンの中に表示するコンテンツ
- keyboardShortcuts
string[]
検索にオーバーレイして表示させるキーボードショートカット
- hitComponent
(props: { hit: Hit, insights: Insights, view: "grid"|"list" }) => JSX.Element | required
検索でヒットしたコンテンツをリスト表示するコンポーネント。以下のプロパティ。
| Prop | Type | Description |
|---|---|---|
hit | Hit | The hit returned by Algolia. |
insights | Insights | The Insights function, already bound to the index, userToken, queryID, objectIDs and positions so that you only have to specify the eventName. |
view | "grid" | "list" | The current view mode. |
- setUserToken
(setToken: (userToken: string) => void) => void
パーソナライゼーションサービス用のuserToken。Personalizationがが使えるプランになっているかAlgoliaのプランをご確認ください。
例:
const config = {
  // ...
  setUserToken(setToken) {
    // Assuming you store the `userToken` in a global variable
    setToken(window.ALGOLIA_USER_TOKEN);
    // Or if you store the `userToken` in an external API
    fetchTokenAsynchronously().then(({ token }) => setToken(token));
  },
};
googleAnalytics
boolean
クエリがトリガーされた時にイベントをGoogle Analyticsに送るかどうかの設定。global Google Analytics objectであるgaがwindowで扱える必要がある。
- refinements
Refinementsを参照
- sorting
Sortingを参照
styles
3. 検索UIのカスタマイズ
検索UIをカスタマイズする際の設定ファイル: どのRefinementsを表示するか、どの項目でソートを行うか等
Overview
- Refinements
- Hierarchical (階層型)
- Category
- List
- Slider (価格等でのスライド式)
- Sortings (ソート)
Refinements
Refinementは通常検索UIの左側のパネルで検索のフィルタリングをするために機能するもの。各Refinementの順序は設定ファイルの順番に従う。
それぞれのrefinementオブジェクトは以下の設定項目を含む:
| Key | Type | Description | Preview |
|---|---|---|---|
type | "list" | "category" | "hierarchical" | "slider" | The type of the refinement. | N/A |
header | string | The content to display in the refinement panel header. |  |
label | string | The label to display in the active refinements. |  |
options | object | The refinement options forwarded to the InstantSearch widget | N/A |
Refinementsのオプションを追加するには該当のアトリビュートをattributes for facetingに追加する必要がある。この設定にはAlgoliaのダッシュボードを使っても良いし、AlgoliaのAPIを使ってattributesForFacetingの設定しても良い。
例:
const config = {
  // ...
  refinements: [
    {
      {
      type: 'list',
      header: 'Brands',
      label: 'Brand',
      options: {
        attribute: 'brand',
      },
    },
  ]
}
Hierarchical
| Preview | 説明 |
|---|---|
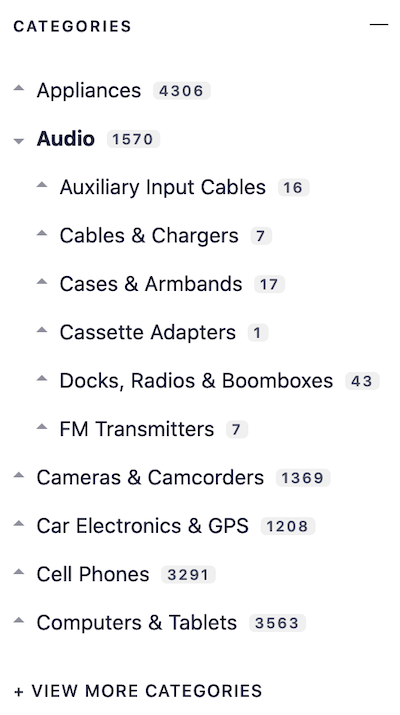 | The hierarchical(階層型) refinement creates a navigation based on a hierarchy of facet attributes. サブカテゴリがあるような場合に使われる。 |
レコードのスキーマ
以下のような構造となっている必要がある。
[
  {
    "objectID": "321432",
    "name": "lemon",
    "categories.lvl0": "products",
    "categories.lvl1": "products > fruits"
  },
  {
    "objectID": "8976987",
    "name": "orange",
    "categories.lvl0": "products",
    "categories.lvl1": "products > fruits"
  }
]
また、以下のようにそれぞれのレベルごとに複数のパスを設定することも可能
[
  {
    "objectID": "321432",
    "name": "lemon",
    "categories.lvl0": ["products", "goods"],
    "categories.lvl1": ["products > fruits", "goods > to eat"]
  }
]
設定オプション
| Key | Type | Description |
|---|---|---|
type | "hierarchical" | The type of the refinement. |
header | string | The content to display in the refinement panel header. |
label | string | The label to display in the active refinements. |
options | object | The options forwarded to the HierarchicalMenu InstantSearch widget. |
例:
const config = {
  // ...
  refinements: [
    {
      type: 'hierarchical',
      header: 'Categories',
      label: 'Category',
      options: {
        attributes: [
          'hierarchicalCategories.lvl0',
          'hierarchicalCategories.lvl1',
        ],
        limit: 6,
        showMore: true,
      },
    },
  ],
};
Category
| Preview | 説明 |
|---|---|
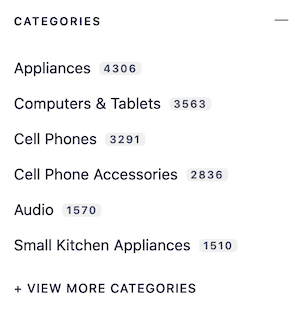 | The category refinement displays a menu that lets the user choose a single value for a specific attribute. 一つの項目を選択する際に利用 |
オプション
| Key | Type | Description |
|---|---|---|
type | "category" | The type of the refinement. |
header | string | The content to display in the refinement panel header. |
label | string | The label to display in the active refinements. |
options | object | The options forwarded to the Menu InstantSearch widget. |
例:
const config = {
  // ...
  refinements: [
    {
      type: 'category',
      header: 'Categories',
      label: 'Category',
      options: {
        attribute: 'category',
        limit: 6,
        showMore: true,
      },
    },
  ],
};
List
| Preview | 説明 |
|---|---|
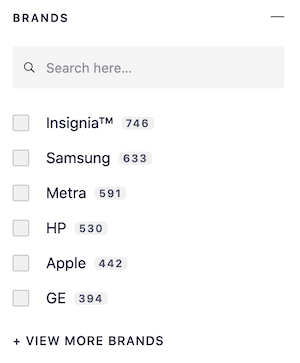 | The list refinement displays a list that lets the user choose multiple values for a specific attribute. 複数の項目を選択するような際に利用 |
設定オプション
| Key | Type | Description |
|---|---|---|
type | "list" | The type of the refinement. |
header | string | The content to display in the refinement panel header. |
label | string | The label to display in the active refinements. |
options | object | The options forwarded to the RefinementList InstantSearch widget. |
例:
const config = {
  // ...
  refinements: [
    {
      type: 'list',
      header: 'Brands',
      label: 'Brand',
      options: {
        attribute: 'brand',
        searchable: true,
        showMore: true,
        limit: 6,
      },
    },
  ],
};
Slider
| Preview | 説明 |
|---|---|
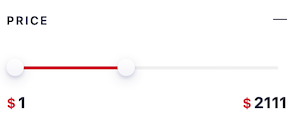 | The slider refinement provides a user-friendly way to filter the results based on a single numeric range. 数値のレンジで絞り込むような際に利用 |
アトリビュートが数値の場合のみ利用可能。
設定オプション
| Key | Type | Description |
|---|---|---|
type | "slider" | The type of the refinement. |
header | string | The content to display in the refinement panel header. |
label | string | The label to display in the active refinements. |
options | RefinementOptions | The options of the refinement. |
RefinementOptions
| Name | Type | Description |
|---|---|---|
transformValue | (value: number) => ReactNode | Function to transform the minimum and maximum displayed values. |
例:
const config = {
  // ...
  refinements: [
    {
      type: 'slider',
      header: 'Price',
      label: 'Price',
      options: {
        attribute: 'price',
        transformValue: (value) => (
          <>
            <span className="uni-Hit-currency">$</span>
            {value}
          </>
        ),
      },
    },
  ],
};
Sorting
sortsの設定はインデックスのリストを表示し、ユーザーが表示順を選択できるようにする(replica indicesを利用)
全てのインデックスをメインのインデックスのレプリカとして定義する必要がある。
| Key | Type | Description |
|---|---|---|
label | string | The label to display for the index. |
value | string | The Algolia index name to target. |
例えば2つ追加でソートの設定を行う場合:
const config = {
  // ...
  sorts: [
    {
      label: 'Relevance',
      value: 'instant_search',
    },
    {
      label: 'Best price',
      value: 'instant_search_price_asc',
    },
    {
      label: 'Best rating',
      value: 'instant_search_rating_desc',
    },
  ],
};
追加でソートを行わない場合
const config = {
  // ...
  sorts: [],
};
4. スタイルの調整
src/config/index.jsファイルでUnified InstantSearch E-CommerceをあなたのWebサイトに見合った形で調整可能にします。全てのオプションは styles 配下にある。
注: これらの設定をdevelopment modeで行って設定の変更を確認するには、サーバーのリスタートを行う必要がある。
Overview
- Options
- colors
- text
- breakpoints
- baseZIndex
- Styling the search button
- Style conflicts
Options
- colors
object | required
| Key | Type | Description |
|---|---|---|
primary | string | The accent color, typically the main color of your branding. |
secondary | string | The secondary color, for most of the text content. |
内部的には CSS custom properties を使って、サポートされていないブラウザへの静的なフォールバックを行う。もし、CSS custom properties(例えば複数のテーマカラーを導入する等)を行いたい場合は、color variablesを初期値として設定(古いブラウザへのフォールバックも)すること。そうすることで、オーバーライドが可能になり、あなたのWebサイトのCSSで関連するCSS custom propertiesを望んでいるコンテキストで設定できるようになる。
- text
object | required
| Key | Type | Description |
|---|---|---|
fontFamily | string | The global font stack. |
もし、あなたのWebサイトで使っているフォントと同じものにしたい場合、valueをinheritにすることをおすすめ。
- breakpoints
object | required
| Key | Type | Description |
|---|---|---|
sm | number | The breakpoint for small devices. |
md | number | The breakpoint for medium devices. |
lg | number | The breakpoint for large devices. |
Unified InstantSearch E-Commerceはデフォルトのブレイクポイントに沿ってデザインされています。これを変える場合はレイアウトが想定通りになっているか確認のこと。
- baseZIndex
number | required
全体の検索UIのベースとなる z-index。検索UIが上位にくるようにWebサイトのCSSで設定したz-indexより髙い値を設定すること。
検索ボタンのスタイリング
Unified InstantSearch E-Commerceは、指定したinputContainerに検索ボタンを生成します。デフォルトのスタイルを変更もしくは完全に削除するようなこともできる。
これを行うためには、src/components/SearchButton.scssファイルを編集。デフォルトのスタイルを消す場合はファイルを削除。
スタイルのコンフリクト
Unified InstantSearch E-Commerceは、独自のCSSツールを用いることで、Webサイトのスタイルとコンフリクトが起こらないようにデザインされているものの、Webサイト側でグローバルに適用されてしまうCSSを使っている場合は競合が発生する。
もし、そのような事になった場合は、WebサイトのCSSの方で例えば h1 を使うのではなく、 .myApp h1 のようにしたり、CSSのショートハンド(一括指定)プロパティを活用することをおすすめ。


コメント
[…] また、私の方でも以前、Unified InstantSearchの使い方を紹介するブログ記事 を書かせていただいておりますので、よろしければご覧くださいませ。 […]