先日AlgoliaブログのDrive loyalty with better mobile experiencesという記事を翻訳しましたが、モバイルアプリの重要性を再認識したところで、早速新しくなったInstantSearch Androidを試してみたいと思います。
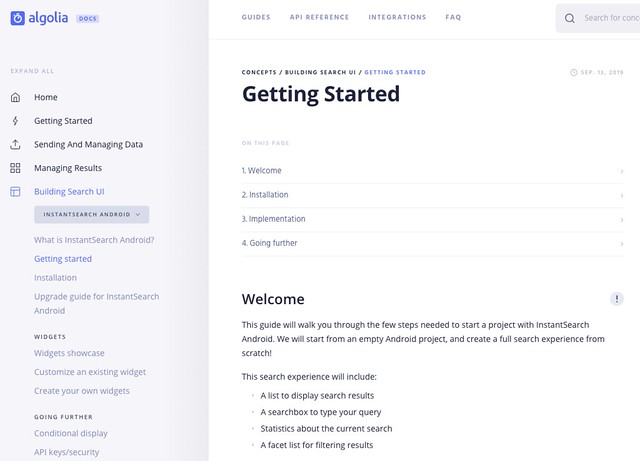
参考にするのは Algoliaのドキュメント の Building Search UI の InstantSearch Android の Getting Started の ページ。
 //embedr.flickr.com/assets/client-code.js
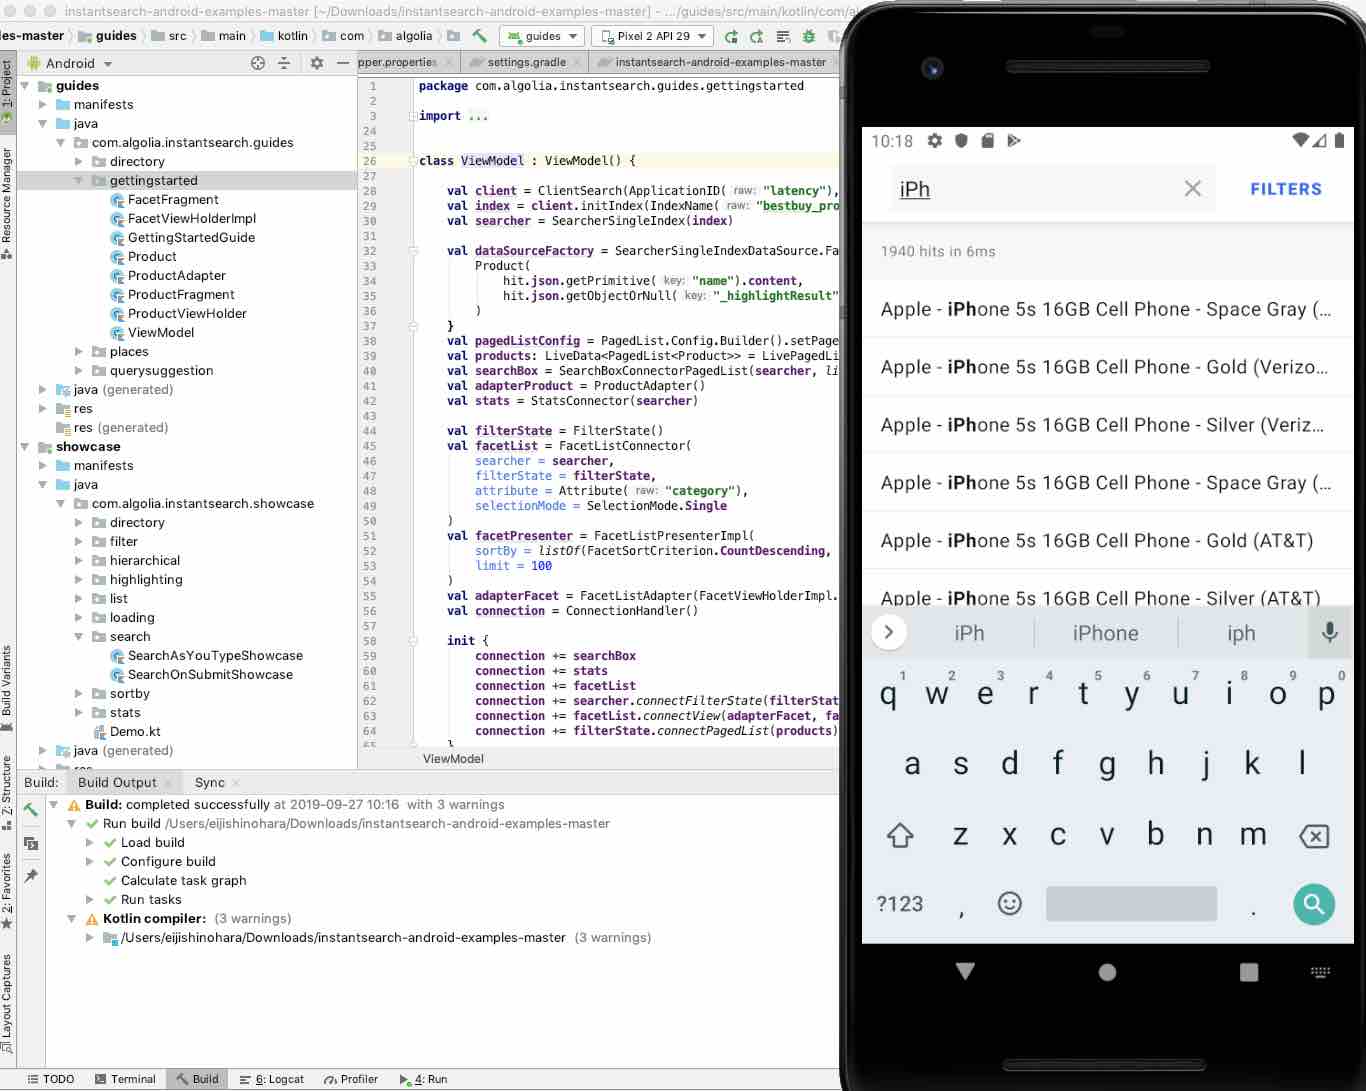
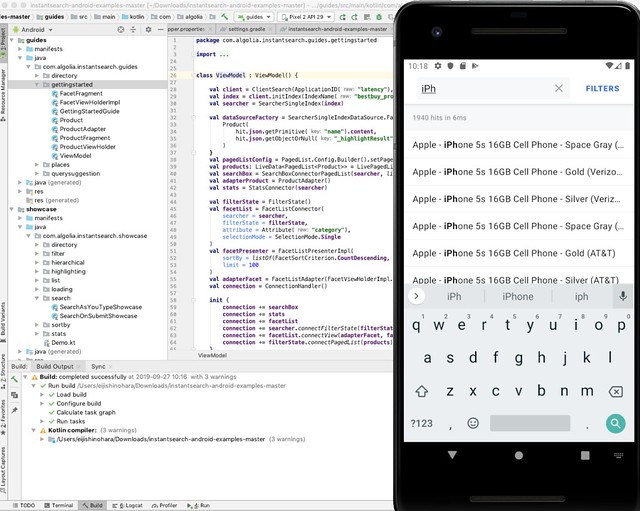
ソースコードは、 Algolia の Githubリポジトリ の instantsearch-android-examples の中の guides からの gettingstarted にある.kt(Kotlinの拡張子)ファイルたちです。
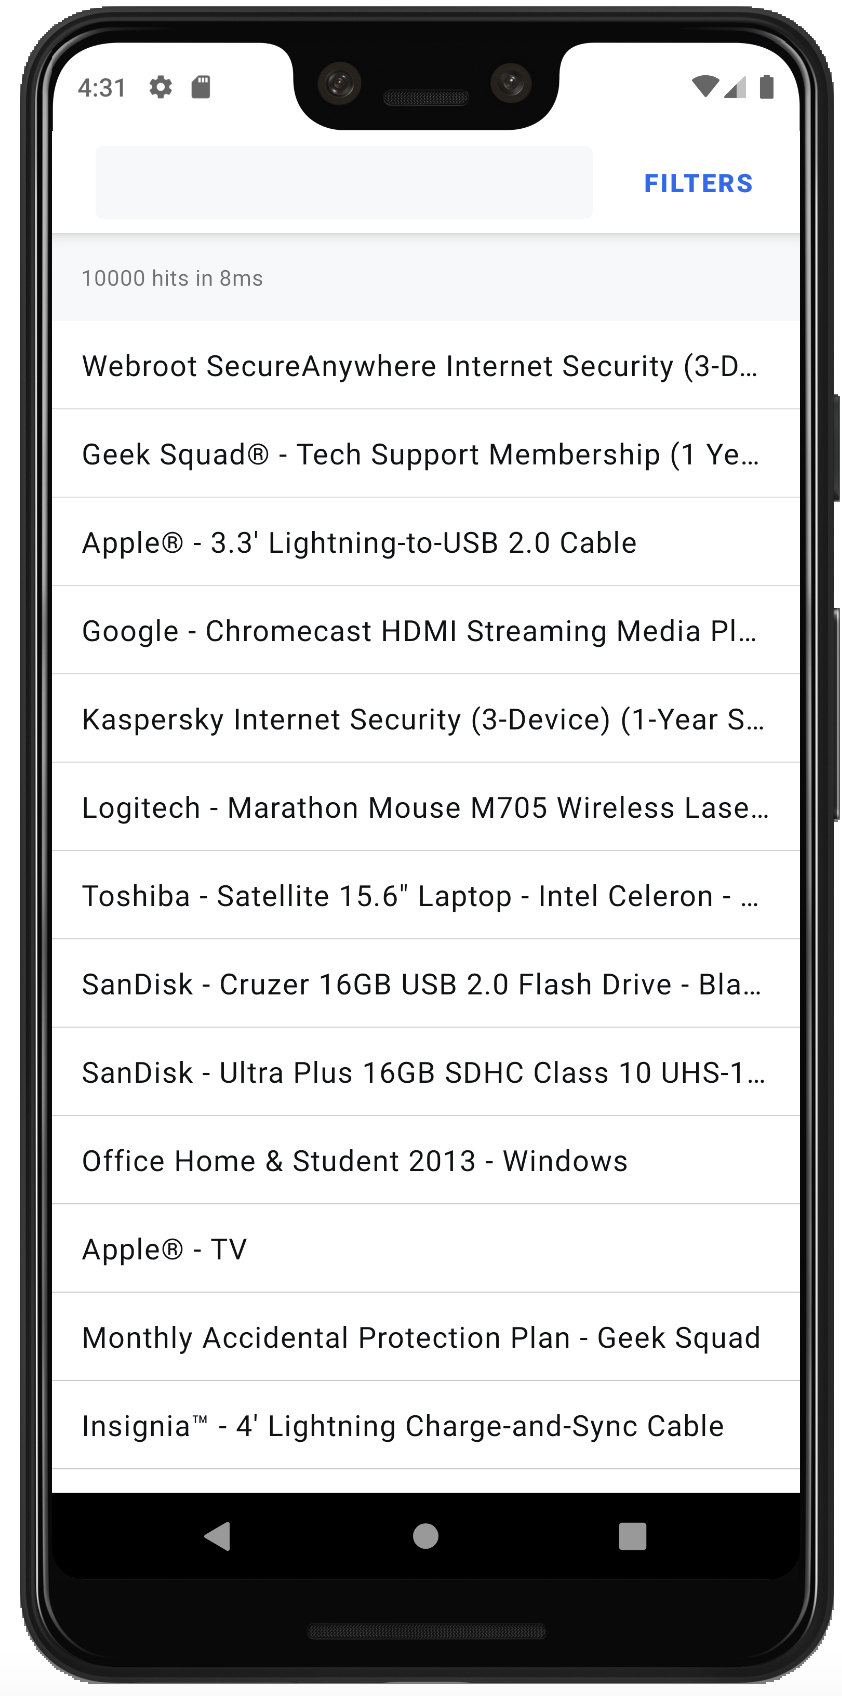
リポジトリごとZipでソースコードを落としてきて、Android Studioにインポート後、Runした時に👇のような感じになっていたら、動いていると言えるのかなと思います。
 //embedr.flickr.com/assets/client-code.js
では、各章ごとに見ていきましょう。
1. Welcome
このガイドはInstantSearch Androidを使ってプロジェクトをはじめるウォークスルーするものになります。
– 検索結果を表示するリスト
– クエリ文字列を入力する検索ボックス
– 現在の検索のStats
– 検索結果をフィルタリングするためのファセットリスト
2. Installation
https://www.algolia.com/users/sign_up からサインアップしていただくことも出来ますが、以下のデータセット及びAlgoliaのインデックスを使ってお試しいただくことも出来ます。
– APP ID: latency
– Search API Key: 3d9875e51fbd20c7754e65422f7ce5e1
– Index name: bestbuy
こちらのクレデンシャル(インデックス)には今回のガイドに適した形でプロダクトのデータセットが取り込まれています。
新しいプロジェクトの作成とInstantSearch Androidの追加
ゼロから構築していく場合は、Android Studio で create a new Project していきます。
– Target画面で Phone and Tablet を選びます
– Add an Activity画面で Empty Activity を選びます
アプリケーションのbuild.gradleに👇のdependency(依存ライブラリ)を追加します。2.X.Xのところは適宜https://github.com/algolia/instantsearch-android/releasesで最新のものをチェックしてください、とのこと。
implementation 'com.algolia:instantsearch-android:2.X.X'
Githubからダウンロードしてきたプロジェクトでは、”Project: instantsearch-android-examples-master” の build.gradle に ext.instantsearch = ‘2.0.3’ と書いてあって、”Module: guides” の build.gradle に implementation “com.algolia:instantsearch-android:$instantsearch” と書かれていました。この辺の仕掛けに関しては Use variables to manage gradle android dependencies library version numbers が参考になりそうでした👇
Use ext variables in your gradle files to put the version number in one place and manage all those version numbers in one single place in gradle.
そして、InstantSearch AndroidではAndroid Architecture Componentsを使うため、以下の追加も必要になります。
implementation "androidx.lifecycle:lifecycle-extensions:2.1.0"
implementation "androidx.lifecycle:lifecycle-common-java8:2.1.0"
3. Implementation
アーキテクチャーの概要
– MyActivity: このActivityは現在表示されているFragment(参考:Android はじめてのFragment)をコントロール
– MyViewModel: Android Architecture Components の ViewModel。ビジネスロジックはここに記述する
– ProductFragment: このFragmentは検索結果を RecyclerView に、入力を SearchView に、そして Stats のインジケーターを表示する
– FacetFragment: このFragmentは検索結果をフィルタリングするためのファセットのリストを表示する
Searcherのイニシャライズ
検索体験の中心部分を担うのは Searcher になります。Searcher は検索リクエストを受け取り、検索結果を取得します。
ほとんど全てのInstantSearchのコンポーネントはこの Searcher と紐付いています。このチュートリアルでは一つのIndexのみがターゲットなので、 SearchSingleIndex のインスタンスを上記のクレデンシャルを使って生成します。
MyViewModel.ktのコードは以下のようになります。
※ 2019年9月27日現在はダウンロードしてきたプロジェクトにMyViewModelってクラスは無くて ViewModel で、使うインデックスも bestbuy ではなく、bestbuy_promo(コレはドキュメントもそう)だったりしますが、その辺はよしなに解釈していく方向で…mm
class MyViewModel : ViewModel() {
    val client = ClientSearch(ApplicationID("latency"), APIKey("1f6fd3a6fb973cb08419fe7d288fa4db"), LogLevel.ALL)
    val index = client.initIndex(IndexName("bestbuy_promo"))
    val searcher = SearcherSingleIndex(index)
    override fun onCleared() {
        super.onCleared()
        searcher.cancel()
    }
}
ViewModel はデータソースを記述するのに良い場所で、例えばこの部分一箇所に変更を行えば、それは各Fragment間で共有できることになります。
結果の表示: Hits
RecyclerView に結果を表示したい場合、優れたユーザー体験を提供し、何千ものプロダクトをいい感じに表示するために、Android Architecture ComponentのPagingライブラリを使ってinfinite(無限)スクロールメカニズムを実装します。
結果を表示する最初のステップとしては LiveData オブジェクトを作成し、プロダクトのページリストを保持させます。
– Product dataクラスを作成して、そこに name フィールドを保持します。
data class Product(
    val name: String
)
– product_item.xml ファイルを作成
<com.google.android.material.card.MaterialCardView
    xmlns:android="http://schemas.android.com/apk/res/android"
    xmlns:app="http://schemas.android.com/apk/res-auto"
    xmlns:tools="http://schemas.android.com/tools"
    android:layout_width="match_parent"
    android:layout_height="?attr/listPreferredItemHeightSmall"
    android:layout_marginBottom="0.5dp"
    app:cardCornerRadius="0dp"
    tools:layout_height="50dp">
    <TextView
        android:id="@+id/itemName"
        android:layout_width="wrap_content"
        android:layout_height="wrap_content"
        android:layout_gravity="center_vertical"
        android:layout_marginStart="16dp"
        android:layout_marginEnd="16dp"
        android:ellipsize="end"
        android:maxLines="1"
        android:textAppearance="?attr/textAppearanceBody1"
        tools:text="@tools:sample/lorem/random" />
</com.google.android.material.card.MaterialCardView>
– Product のアイテムを RecyclerVeiw.ViewHolder にバインドするために ProductViewHolder を作成
class ProductViewHolder(val view: View) : RecyclerView.ViewHolder(view) {
    fun bind(product: Product) {
        view.productName.text = product.name
    }
}
– PagedListAdapter を継承して ProductAdapter を作成。こうすることで、プロダクトが ViewHolder にバインドされる
class ProductAdapter : PagedListAdapter(ProductAdapter) {
    override fun onCreateViewHolder(parent: ViewGroup, viewType: Int): ProductViewHolder {
        val view = LayoutInflater.from(parent.context).inflate(R.layout.product_item, parent, false)
        return ProductViewHolder(view)
    }
    override fun onBindViewHolder(holder: ProductViewHolder, position: Int) {
        val product = getItem(position)
        if (product != null) holder.bind(product)
    }
    companion object : DiffUtil.ItemCallback() {
        override fun areItemsTheSame(
            oldItem: Product,
            newItem: Product
        ): Boolean {
            return oldItem::class == newItem::class
        }
        override fun areContentsTheSame(
            oldItem: Product,
            newItem: Product
        ): Boolean {
            return oldItem.name == newItem.name
        }
    }
}
Searcher で LiveData<PagedList> を 取得するための、SearcherSingleIndexDataSource.Factory を使えるようになりました。これを ViewModel の中で以下のように行います。
class MyViewModel : ViewModel() {
    // Searcher initialization
    // ...
    val dataSourceFactory = SearcherSingleIndexDataSource.Factory(searcher) { hit ->
        Product(
            hit.json.getPrimitive("name").content
        )
    }
    val pagedListConfig = PagedList.Config.Builder().setPageSize(50).build()
    val products: LiveData<PagedList> = LivePagedListBuilder(dataSourceFactory, pagedListConfig).build()
    val adapterProduct = ProductAdapter()
    override fun onCleared() {
        super.onCleared()
        searcher.cancel()
        connection.disconnect()
    }
}
ここまで、exampleをシンプルに保つため、 Product オブジェクトをhit’s JSONから自前で生成してきました。しかし、プロダクションで稼働するアプリケーションとしては、 kotlinx.serializtion ライブラリを使ってJSONからオブジェクトに変換することをおすすめします。
ViewModel でデータが取得できたら、シンプルな product_fragment.xml とともに Toolbar と RecyclerView を作ってプロダクトを表示しましょう。
<?xml version="1.0" encoding="utf-8"?>
<androidx.constraintlayout.widget.ConstraintLayout
    xmlns:android="http://schemas.android.com/apk/res/android"
    xmlns:app="http://schemas.android.com/apk/res-auto"
    android:layout_width="match_parent"
    android:layout_height="match_parent">
    <androidx.appcompat.widget.Toolbar
        android:id="@+id/toolbar"
        app:layout_constraintTop_toTopOf="parent"
        android:layout_width="0dp"
        app:layout_constraintEnd_toEndOf="parent"
        app:layout_constraintStart_toStartOf="parent"
        android:layout_height="?attr/actionBarSize"/>
    <androidx.recyclerview.widget.RecyclerView
        android:id="@+id/productList"
        app:layout_constraintTop_toBottomOf="@id/stats"
        app:layout_constraintEnd_toEndOf="parent"
        app:layout_constraintStart_toStartOf="parent"
        app:layout_constraintBottom_toBottomOf="parent"
        android:layout_width="0dp"
        android:layout_height="0dp"/>
</androidx.constraintlayout.widget.ConstraintLayout>
– ProductFragment で MyViewModel の参照を ViewModelProviders とともに取得(Kotlinでリフレクションを行うとこういう感じなのか的な)
– ProductAdapterが商品のページを更新されるのを LiveData で見張る
– 最後に、RecyclerView をアダプタのセッティングと LayoutManager で設定する
class ProductFragment : Fragment() {
    override fun onCreateView(inflater: LayoutInflater, container: ViewGroup?, savedInstanceState: Bundle?): View? {
        return inflater.inflate(R.layout.product_fragment, container, false)
    }
    override fun onViewCreated(view: View, savedInstanceState: Bundle?) {
        super.onViewCreated(view, savedInstanceState)
        val viewModel = ViewModelProviders.of(requireActivity())[MyViewModel::class.java]
        viewModel.products.observe(this, Observer { hits -> viewModel.adapterProduct.submitList(hits) })
        productList.let {
            it.itemAnimator = null
            it.adapter = viewModel.adapterProduct
            it.layoutManager = LinearLayoutManager(requireContext())
            it.autoScrollToStart(viewModel.adapterProduct)
        }
    }
}
これで RecyclerView で無限スクロールを実現出来るようになりました!
データを検索する: SearchBox
データを検索するには検索窓が必要です。検索窓で行われたいかなるオペレーションは新しい検索リクエストとのトリガーとなり、即座に検索結果が表示されるべきです。
これを行うために、 SearchBoxConnectorPagedList を使います。これには引数として Searcher と LiveData<PagedList> を渡します。
– まずは上記のように LiveData に商品データを詰め込みましょう
class MyViewModel : ViewModel() {
    // Searcher initialization
    // Hits initialization
    // ...
    val searchBox = SearchBoxConnectorPagedList(searcher, listOf(products))
    val connection = ConnectionHandler()
    init {
        connection += searchBox
    }
    override fun onCleared() {
        super.onCleared()
        searcher.cancel()
        connection.disconnect()
    }
}
ワーニング
ほとんどの InstantSearch のコンポーネントは、AndroidのLifecyleに従って接続および切断し、メモリリークを回避する必要があります。 ConnectionHandlerがConnectionsのセットを処理します: Connectionインターフェースを実装するコンポーネントでの Each += call は、それを接続してアクティブにします。リソースを解放したり、コンポーネントを非アクティブにしたいときはいつでも、disconnectメソッドを呼び出します。
– SearchView を Toolbar に追加できるようになりました:
<?xml version="1.0" encoding="utf-8"?>
<androidx.constraintlayout.widget.ConstraintLayout
    xmlns:android="http://schemas.android.com/apk/res/android"
    xmlns:app="http://schemas.android.com/apk/res-auto"
    android:layout_width="match_parent"
    android:layout_height="match_parent">
    <androidx.appcompat.widget.Toolbar
        android:id="@+id/toolbar"
        app:layout_constraintTop_toTopOf="parent"
        android:layout_width="0dp"
        app:layout_constraintEnd_toEndOf="parent"
        app:layout_constraintStart_toStartOf="parent"
        android:layout_height="?attr/actionBarSize">
        <androidx.constraintlayout.widget.ConstraintLayout
            xmlns:tools="http://schemas.android.com/tools"
            android:layout_width="match_parent"
            android:layout_height="match_parent"
            android:clipChildren="false"
            android:clipToPadding="false">
            <androidx.appcompat.widget.SearchView
                android:id="@+id/searchView"
                android:layout_width="0dp"
                android:layout_height="0dp"
                android:focusable="false"
                app:layout_constraintBottom_toBottomOf="parent"
                app:layout_constraintEnd_toStartOf="@id/filters"
                app:layout_constraintStart_toStartOf="parent"
                app:layout_constraintTop_toTopOf="parent"
                app:iconifiedByDefault="false"/>
        </androidx.constraintlayout.widget.ConstraintLayout>
    </androidx.appcompat.widget.Toolbar>
    <androidx.recyclerview.widget.RecyclerView
        android:id="@+id/productList"
        app:layout_constraintTop_toBottomOf="@id/stats"
        app:layout_constraintEnd_toEndOf="parent"
        app:layout_constraintStart_toStartOf="parent"
        app:layout_constraintBottom_toBottomOf="parent"
        android:layout_width="0dp"
        android:layout_height="0dp"/>
</androidx.constraintlayout.widget.ConstraintLayout>
– SearchBoxViewAppCompat を MyViewModelにストアされている SearchBoxConnectorPagedList につなぎます。新しい ConnectionHandler を使うことで、 ProductFragment のライフサイクルに従います:
class ProductFragment : Fragment() {
    private val connection = ConnectionHandler()
    override fun onCreateView(inflater: LayoutInflater, container: ViewGroup?, savedInstanceState: Bundle?): View? {
        return inflater.inflate(R.layout.product_fragment, container, false)
    }
    override fun onViewCreated(view: View, savedInstanceState: Bundle?) {
        super.onViewCreated(view, savedInstanceState)
        val viewModel = ViewModelProviders.of(requireActivity())[MyViewModel::class.java]
        // Hits
        // ...
        val searchBoxView = SearchBoxViewAppCompat(searchView)
        connection += viewModel.searchBox.connectView(searchBoxView)
    }
    override fun onDestroyView() {
        super.onDestroyView()
        connection.disconnect()
    }
}
Displaying metadata: Stats
何件のデータが取得できたのかを表示することは良いプラクティスです。Stats コンポーネントを使ってこれをわずか数行で実現していきます:
– StatsConnector を MyViewModel に追加して、ConnectionHandlerを使って接続します
class MyViewModel : ViewModel() {
    // Searcher initialization
    // Hits initialization
    // SearchBox initialization
    // ...
    val stats = StatsConnector(searcher)
    val connection = ConnectionHandler()
    init {
        connection += stats
    }
    override fun onCleared() {
        super.onCleared()
        searcher.cancel()
        connection.disconnect()
    }
}
– product_fragment.xml に TextView を追加し、statsを表示させます
<?xml version="1.0" encoding="utf-8"?>
<androidx.constraintlayout.widget.ConstraintLayout
    xmlns:android="http://schemas.android.com/apk/res/android"
    xmlns:app="http://schemas.android.com/apk/res-auto"
    android:layout_width="match_parent"
    android:layout_height="match_parent">
    <androidx.appcompat.widget.Toolbar
        android:id="@+id/toolbar"
        app:layout_constraintTop_toTopOf="parent"
        android:layout_width="0dp"
        app:layout_constraintEnd_toEndOf="parent"
        app:layout_constraintStart_toStartOf="parent"
        android:layout_height="?attr/actionBarSize">
        <androidx.constraintlayout.widget.ConstraintLayout
            xmlns:tools="http://schemas.android.com/tools"
            android:layout_width="match_parent"
            android:layout_height="match_parent"
            android:clipChildren="false"
            android:clipToPadding="false">
            <androidx.appcompat.widget.SearchView
                android:id="@+id/searchView"
                android:layout_width="0dp"
                android:layout_height="0dp"
                android:focusable="false"
                app:layout_constraintBottom_toBottomOf="parent"
                app:layout_constraintEnd_toStartOf="@id/filters"
                app:layout_constraintStart_toStartOf="parent"
                app:layout_constraintTop_toTopOf="parent"
                app:iconifiedByDefault="false"
                tools:queryHint="@string/search_colors"/>
        </androidx.constraintlayout.widget.ConstraintLayout>
    </androidx.appcompat.widget.Toolbar>
    <TextView
        android:id="@+id/stats"
        android:textAppearance="@style/TextAppearance.MaterialComponents.Caption"
        app:layout_constraintTop_toBottomOf="@+id/toolbar"
        app:layout_constraintStart_toStartOf="parent"
        app:layout_constraintEnd_toEndOf="parent"
        android:padding="16dp"
        android:layout_width="0dp"
        android:layout_height="wrap_content"/>
    <androidx.recyclerview.widget.RecyclerView
        android:id="@+id/productList"
        app:layout_constraintTop_toBottomOf="@id/stats"
        app:layout_constraintEnd_toEndOf="parent"
        app:layout_constraintStart_toStartOf="parent"
        app:layout_constraintBottom_toBottomOf="parent"
        android:layout_width="0dp"
        android:layout_height="0dp"/>
</androidx.constraintlayout.widget.ConstraintLayout>
– 最後に StatsConnector を ProductFragment の StatsTextView に接続します
class ProductFragment : Fragment() {
    private val connection = ConnectionHandler()
    override fun onCreateView(inflater: LayoutInflater, container: ViewGroup?, savedInstanceState: Bundle?): View? {
        return inflater.inflate(R.layout.product_fragment, container, false)
    }
    override fun onViewCreated(view: View, savedInstanceState: Bundle?) {
        super.onViewCreated(view, savedInstanceState)
        val viewModel = ViewModelProviders.of(requireActivity())[MyViewModel::class.java]
        // Hits
        // SearchBox
        // ...
        val statsView = StatsTextView(stats)
        connection += viewModel.stats.connectView(statsView, StatsPresenterImpl())
    }
    override fun onDestroyView() {
        super.onDestroyView()
        connection.disconnect()
    }
}
データをフィルタリングする: FacetList
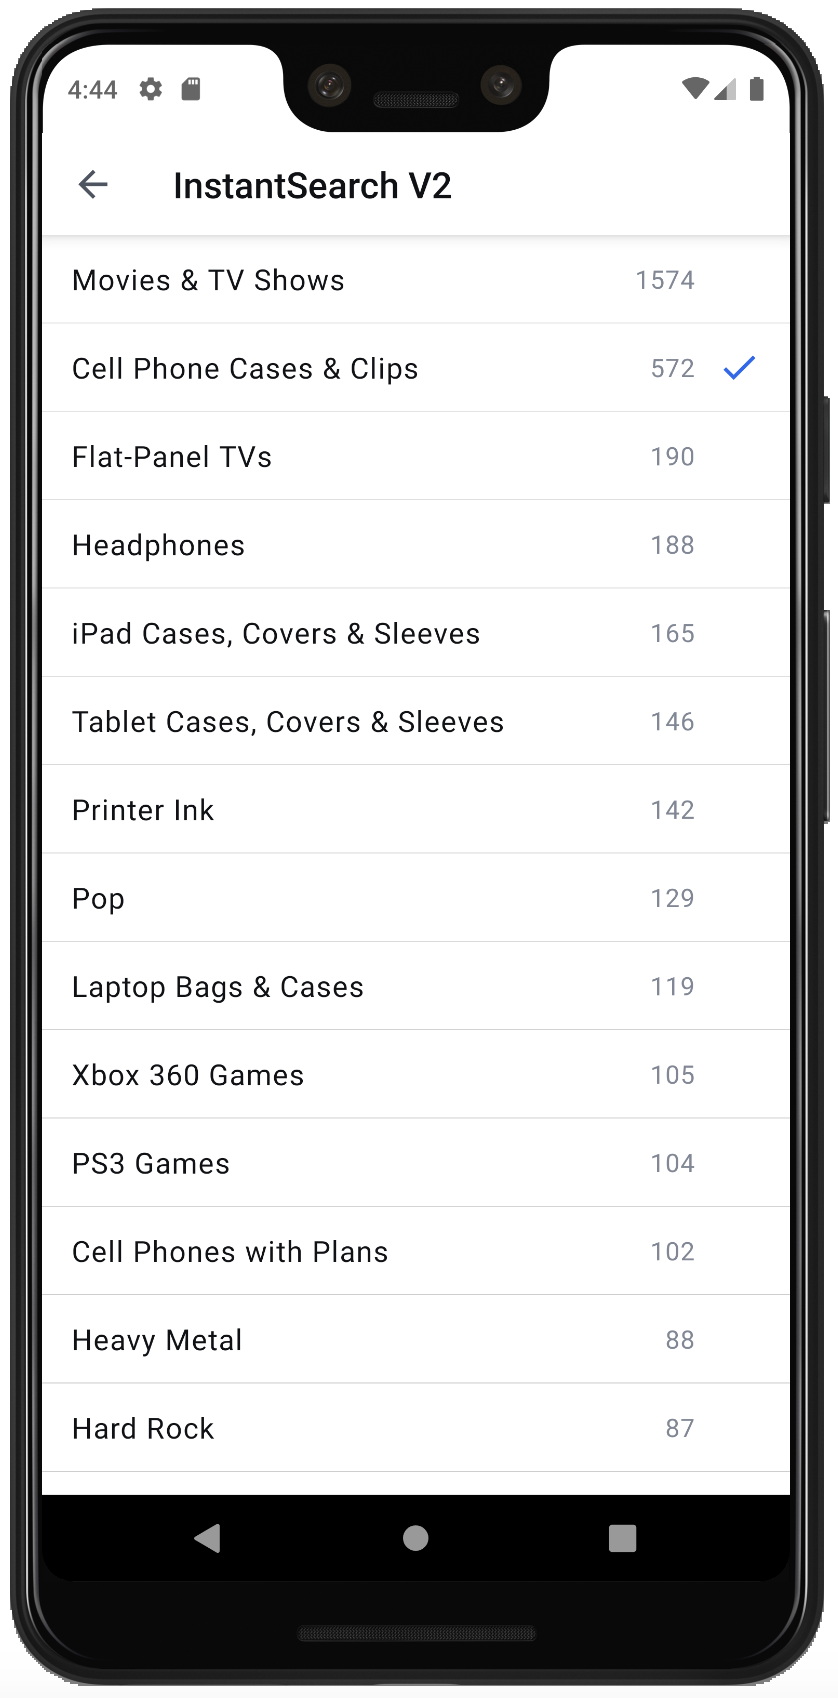
検索結果をフィルタリングすることで、ユーザーは欲しいものを正確に見つけることができるようになります。カテゴリ別に製品をフィルタリングするための FacetList を作成します。
– まずは facet_item.xml を作ります。これは RecyclerView.ViewHolder のレイアウトになります
<com.google.android.material.card.MaterialCardView
        xmlns:android="http://schemas.android.com/apk/res/android"
        xmlns:app="http://schemas.android.com/apk/res-auto"
        xmlns:tools="http://schemas.android.com/tools"
        android:layout_width="match_parent"
        android:layout_height="?attr/listPreferredItemHeightSmall"
        android:layout_marginBottom="0.5dp"
        app:cardCornerRadius="0dp"
        tools:layout_height="50dp">
    <androidx.constraintlayout.widget.ConstraintLayout
            android:layout_width="match_parent"
            android:layout_height="match_parent">
        <ImageView
                android:id="@+id/icon"
                style="@style/Icon"
                android:layout_width="wrap_content"
                android:layout_height="wrap_content"
                android:layout_marginEnd="12dp"
                android:src="@drawable/ic_check"
                android:tint="?attr/colorPrimary"
                android:visibility="invisible"
                app:layout_constrainedHeight="true"
                app:layout_constrainedWidth="true"
                app:layout_constraintBottom_toBottomOf="parent"
                app:layout_constraintEnd_toEndOf="parent"
                app:layout_constraintTop_toTopOf="parent"
                tools:visibility="visible" />
        <TextView
                android:id="@+id/facetCount"
                android:layout_width="wrap_content"
                android:layout_height="wrap_content"
                android:layout_marginEnd="8dp"
                android:ellipsize="end"
                android:gravity="end"
                android:maxLines="1"
                android:textAppearance="?attr/textAppearanceBody2"
                android:textColor="@color/grey_light"
                android:visibility="gone"
                app:layout_constrainedHeight="true"
                app:layout_constrainedWidth="true"
                app:layout_constraintBottom_toBottomOf="parent"
                app:layout_constraintEnd_toStartOf="@id/icon"
                app:layout_constraintTop_toTopOf="parent"
                tools:text="@tools:sample/lorem"
                tools:visibility="visible" />
        <TextView
                android:id="@+id/facetName"
                android:layout_width="0dp"
                android:layout_height="wrap_content"
                android:layout_marginStart="16dp"
                android:layout_marginEnd="16dp"
                android:ellipsize="end"
                android:maxLines="1"
                android:textAppearance="?attr/textAppearanceBody1"
                app:layout_constraintBottom_toBottomOf="parent"
                app:layout_constraintEnd_toStartOf="@id/facetCount"
                app:layout_constraintStart_toStartOf="parent"
                app:layout_constraintTop_toTopOf="parent"
                tools:text="@tools:sample/lorem/random" />
    </androidx.constraintlayout.widget.ConstraintLayout>
</com.google.android.material.card.MaterialCardView>
– 次に、FacetListViewHolder とそのファクトリを実装し、後で FacetListAdapter を使って動作するようにします
class MyFacetListViewHolder(view: View) : FacetListViewHolder(view) {
    override fun bind(facet: Facet, selected: Boolean, onClickListener: View.OnClickListener) {
        view.setOnClickListener(onClickListener)
        view.facetCount.text = facet.count.toString()
        view.facetCount.visibility = View.VISIBLE
        view.icon.visibility = if (selected) View.VISIBLE else View.INVISIBLE
        view.facetName.text = facet.value
    }
    object Factory : FacetListViewHolder.Factory {
        override fun createViewHolder(parent: ViewGroup): FacetListViewHolder {
            return MyFacetListViewHolder(parent.inflate(R.layout.facet_list_item))
        }
    }
}
ここで新しいコンポーネントである FilterState を使います。これはフィルタリングのロジックを管理するコンポーネントです。
– FactoryState を FacetListConnector にわたします。 FacetListConnector は Attribute が必要で、今回は”category”を使います
– MyFacetListViewHolder.Factory を FacetListAdapter にインジェクトします。 FacetListAdapter は out-of-box(箱開けたらすぐ使える的な)な、Facetlist のための RecycleView.Adapterです。
– それぞれのパーツを接続します:
- Searcher は それ自身と FilterState を接続し、検索ごとにフィルタリングを適用します
- FilterState はプロダクトの LiveData と接続し、新しいフィルタが設定された際に、検索結果を制御します
- 最後に facetList をアダプタに接続します
class MyViewModel : ViewModel() {
    val filterState = FilterState()
    val facetList = FacetListConnector(
        searcher = searcher,
        filterState = filterState,
        attribute = Attribute("category"),
        selectionMode = SelectionMode.Single
    )
    val facetPresenter = FacetListPresenterImpl(
        sortBy = listOf(FacetSortCriterion.CountDescending, FacetSortCriterion.IsRefined),
        limit = 100
    )
    val adapterFacet = FacetListAdapter(MyFacetListViewHolder.Factory)
    val connection = ConnectionHandler()
    init {
        connection += facetList
        connection += searcher.connectFilterState(filterState)
        connection += facetList.connectView(adapterFacet, facetPresenter)
        connection += filterState.connectPagedList(products)
    }
    override fun onCleared() {
        super.onCleared()
        searcher.cancel()
        connection.disconnect()
    }
}
– ファセットを表示するために facet_fragment.xml に RecyclerView のレイアウトを作成します
<?xml version="1.0" encoding="utf-8"?>
<androidx.constraintlayout.widget.ConstraintLayout
    xmlns:android="http://schemas.android.com/apk/res/android"
    xmlns:app="http://schemas.android.com/apk/res-auto"
    android:layout_width="match_parent"
    android:layout_height="match_parent">
    <androidx.appcompat.widget.Toolbar
        android:id="@+id/toolbar"
        app:layout_constraintTop_toTopOf="parent"
        android:layout_width="0dp"
        app:layout_constraintEnd_toEndOf="parent"
        app:layout_constraintStart_toStartOf="parent"
        android:layout_height="?attr/actionBarSize"/>
    <androidx.recyclerview.widget.RecyclerView
        android:id="@+id/facetList"
        android:background="@color/white"
        app:layout_constraintTop_toBottomOf="@id/toolbar"
        app:layout_constraintEnd_toEndOf="parent"
        app:layout_constraintStart_toStartOf="parent"
        app:layout_constraintBottom_toBottomOf="parent"
        android:layout_width="0dp"
        android:layout_height="0dp"/>
</androidx.constraintlayout.widget.ConstraintLayout>
– RecycleView を アダプタと LayoutManager と共に設定します
class FacetFragment : Fragment() {
    override fun onCreateView(inflater: LayoutInflater, container: ViewGroup?, savedInstanceState: Bundle?): View? {
        return inflater.inflate(R.layout.facet_fragment, container, false)
    }
    override fun onViewCreated(view: View, savedInstanceState: Bundle?) {
        super.onViewCreated(view, savedInstanceState)
        val viewModel = ViewModelProviders.of(requireActivity())[MyViewModel::class.java]
        facetList.let {
            it.adapter = viewModel.adapterFacet
            it.layoutManager = LinearLayoutManager(requireContext())
            it.autoScrollToStart(viewModel.adapterFacet)
        }
    }
}
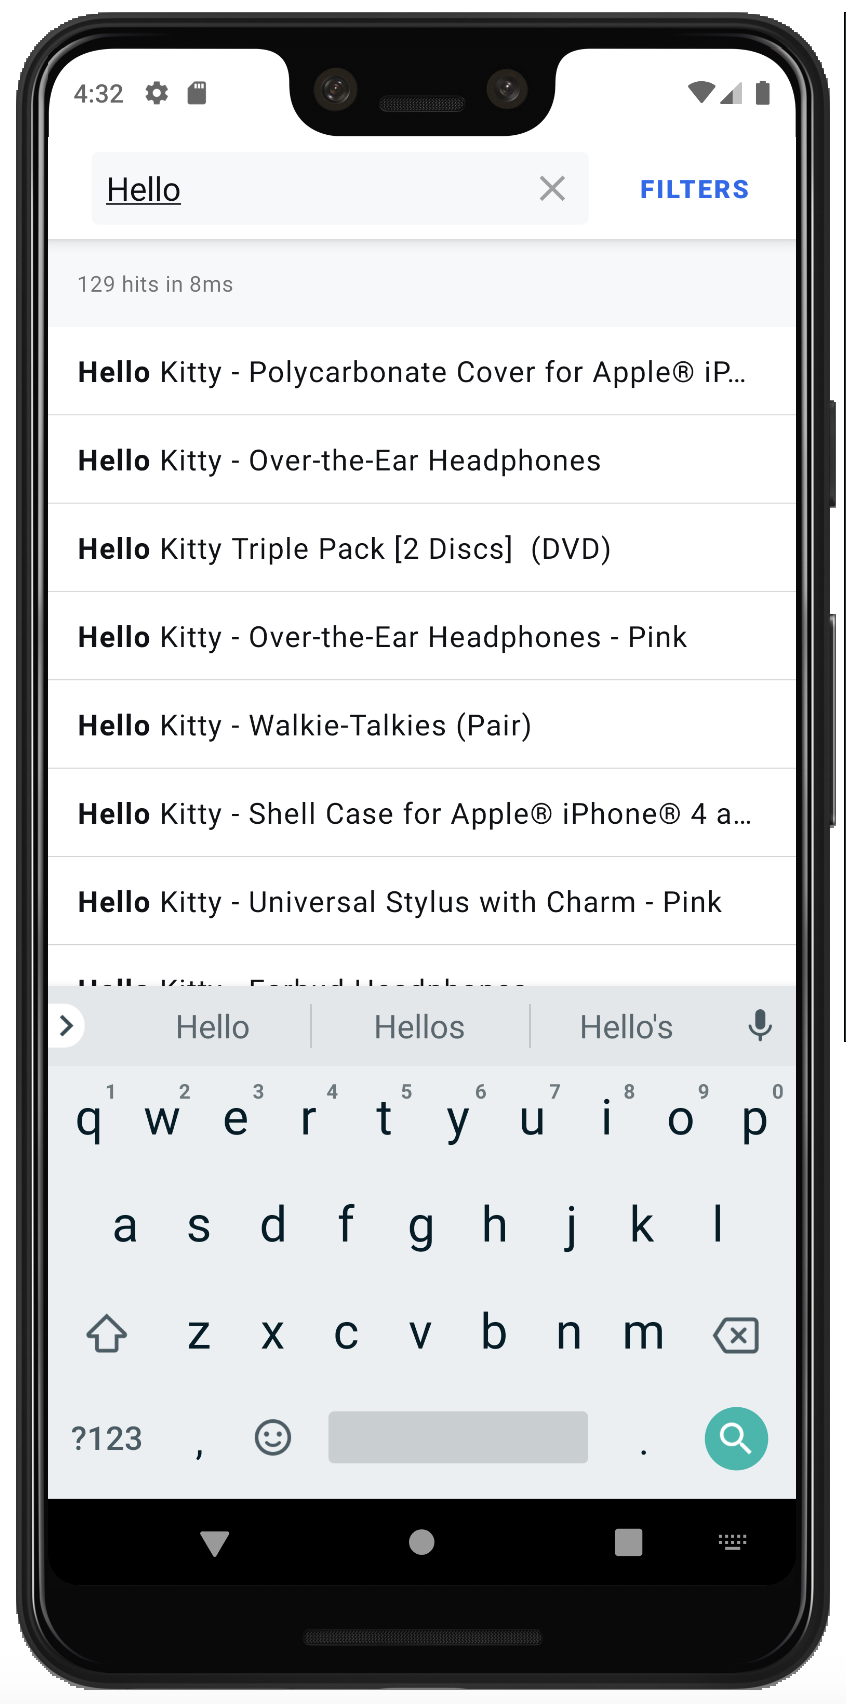
検索体験を向上させましょう: Highlighting
Highlightingはクエリと検索結果がマッチされた箇所を強調し、ユーザー体験をエンハンスメントさせるものです。
ProductクラスがHighlightableインターフェースを実装する形にして、ハイライトを追加します
– 最初に、name属性にハイライトの値を提供するための highlightedName フィールドを定義します
data class Product(
    val name: String,
    override val _highlightResult: JsonObject?
) : Highlightable {
    public val highlightedName: HighlightedString?
        get() = getHighlight(Attribute("name"))
}
– SearcherSingleIndexDataSource のコンストラクタを変更し、それぞれの Product オブジェクトにハイライトの値を注入するようにします
class MyViewModel : ViewModel() {
    // ...
    val dataSourceFactory = SearcherSingleIndexDataSource.Factory(searcher) { hit ->
        Product(
            hit.json.getPrimitive("name").content,
            hit.json.getObjectOrNull("_highlightResult")
        )
    }
    // ...
}
最後にハイライトされたプロダクト名を表示します
– .toSpannedString() を使って、HighlightedString を SpannedString にコンバートします。そうすることで TextView にアサインできるようになります。
class ProductViewHolder(val view: View) : RecyclerView.ViewHolder(view) {
    fun bind(product: Product) {
        view.productName.text = product.highlightedName?.toSpannedString() ?: product.name
    }
}
全てを一つにまとめましょう
これで完全に機能する検索体験を実装することができました: あなたのユーザーはプロダクトを検索し、結果を絞り込み、返ってきたレコード数と、どのようにそのクエリがマッチしたのかを理解することができます!
上記にも記載しましたが、こちらの全てのソースコードは コチラ で見ることができます。
4. より詳細へ
今まで行ってきたことは、InstantSearch Androidで出来ることの紹介に過ぎません。是非、私達の Widget Showcase で様々なコンポーネントをご覧ください!