Amazon EKSがGenerally Availableになったので、チョロっとGetting Startedしてみたいと思います。尚、本ブログの内容はタイトルの通り私個人のものであり、所属企業・部門見解を代表するものではありませんmm
Amazon EKS – Now Generally Available – https://t.co/1NKmjgfb13 #AWS #K8s pic.twitter.com/MmDSWH8oyO
— Jeff Barr ☁️ (@jeffbarr) June 5, 2018

Amazon EKSの事前準備
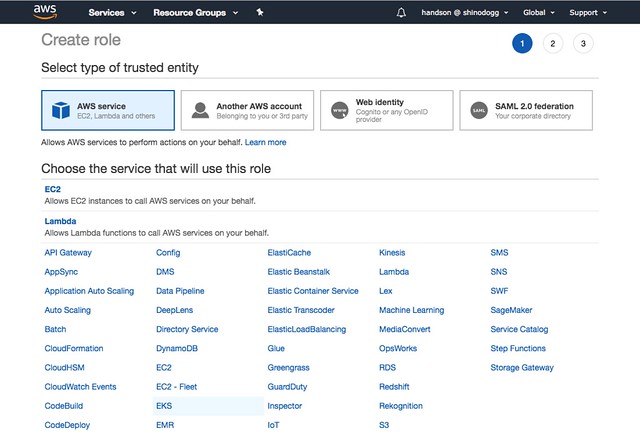
Amazon EKSのクラスタを作る前にk8sがAWSのリソースを作成できるようにIAM roleを作る必要があります。そしてEKSクラスタ用のVPCとセキュリティグループが必要です。
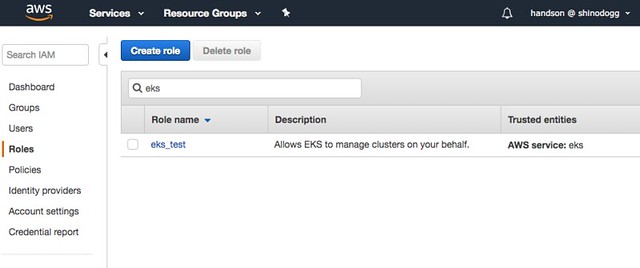
IAM Role作ります
 //embedr.flickr.com/assets/client-code.js
出来ました
 //embedr.flickr.com/assets/client-code.js
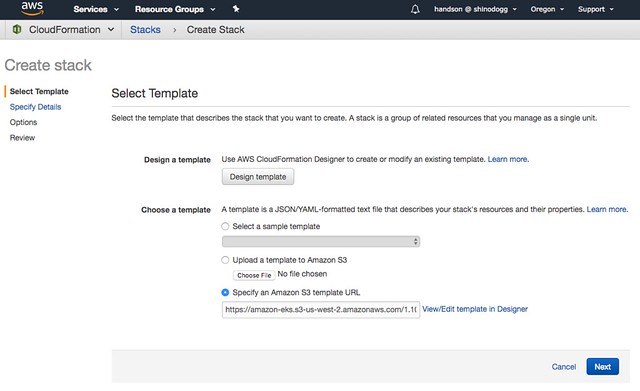
VPC作ります。CloudFormationでOragonリージョンで
 //embedr.flickr.com/assets/client-code.js
Amazon EKSクラスターには kubectl と kubelet が必要で、KubernetesクラスタにIAM authenticationを許可するために Heptio Authenticator を使います。
ということで kubectl をインストールします。自分の場合はMacでやるので↓から Amazon EKS-vended kubectl のバイナリをダウンロードしてきます。
MacOS: https://amazon-eks.s3-us-west-2.amazonaws.com/1.10.3/2018-06-05/bin/darwin/amd64/kubectl
51.2MBでした。コレにパスを通してあげたりします。
$ curl -o kubectl https://amazon-eks.s3-us-west-2.amazonaws.com/1.10.3/2018-06-05/bin/darwin/amd64/kubectl
  % Total    % Received % Xferd  Average Speed   Time    Time     Time  Current
                                 Dload  Upload   Total   Spent    Left  Speed
100 51.2M  100 51.2M    0     0  1512k      0  0:00:34  0:00:34 --:--:-- 2522k
↓こんな感じで叩けたらOK
$ kubectl version --short --client
Client Version: v1.10.3
続いて heptio-authenticator-aws をインストール。こちらも先程のkubectlと同様にcurlでS3から取得後、先程と同様にパスを通してあげたりします。
$ curl -o heptio-authenticator-aws https://amazon-eks.s3-us-west-2.amazonaws.com/1.10.3/2018-06-05/bin/darwin/amd64/heptio-authenticator-aws
  % Total    % Received % Xferd  Average Speed   Time    Time     Time  Current
                                 Dload  Upload   Total   Spent    Left  Speed
100 25.0M  100 25.0M    0     0   997k      0  0:00:25  0:00:25 --:--:-- 1103k
Amazon EKSクラスタを作成
クラスタを作ったIAMユーザーが Kubernetes RBAC authorization table に administrator として登録されている必要があります。今回はCLIを使ってクラスタを作ってみます。事前にEKSに対応した最新版のAWS CLIにしておくのと、aws configureでリージョンをOregon(us-west-2)にしておきます。
そして、aws eksを叩くと、↓のようにクラスタを作ってくれます。
$ aws eks create-cluster --name 名前 --role-arn arn:aws:iam::AWSアカウント:role/作ったEKS用ロール --resources-vpc-config subnetIds=subnet-xxx,subnet-xxx,subnet-xxx,securityGroupIds=sg-xxx
{
    "cluster": {
        "name": "test",
        "arn": "arn:aws:eks:us-west-2:アカウントID:cluster/名前",
        "createdAt": 1528275727.29,
        "version": "1.10",
        "roleArn": "arn:aws:iam::アカウントID:role/作ったEKS用ロール",
        "resourcesVpcConfig": {
            "subnetIds": [
                "subnet-xxx",
                "subnet-xxx",
                "subnet-xxx"
            ],
            "securityGroupIds": [
                "sg-xxx"
            ],
            "vpcId": "vpc-xxx"
        },
        "status": "CREATING",
        "certificateAuthority": {}
    }
}
暫く待ってから構築状況を見てみると、”CREATING”が”ACTIVE”になります。
$ aws eks describe-cluster --name test --query cluster.status
"CREATING"
$ aws eks describe-cluster --name test --query cluster.status
"ACTIVE"
作ったAmazon EKS用にkubectlを設定
kubeconfigファイルを作っていきます。テンプレートはGetting Startedのページにある↓をもとにして、”aws eks describe-cluster –name クラスタ名”を叩いて返ってきた情報で埋めてあげて、”~/.kube/config-クラスタ名”な感じで保存します。
apiVersion: v1
clusters:
- cluster:
    server:
    certificate-authority-data:
  name: kubernetes
contexts:
- context:
    cluster: kubernetes
    user: aws
  name: aws
current-context: aws
kind: Config
preferences: {}
users:
- name: aws
  user:
    exec:
      apiVersion: client.authentication.k8s.io/v1alpha1
      command: heptio-authenticator-aws
      args:
        - "token"
        - "-i"
        - ""
        # - "-r"
        # - ""
で、kubectl get allを叩いてみると↓のような結果が返ってきます。
NAME                 TYPE        CLUSTER-IP   EXTERNAL-IP   PORT(S)   AGE
service/kubernetes   ClusterIP   10.100.0.1           443/TCP   1h
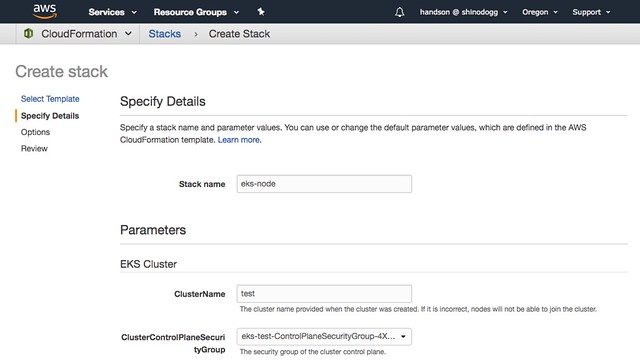
EKSのWorker Nodeを立てる
CloudFormationのCreate Stackで↓のテンプレートを使って構築します。
https://amazon-eks.s3-us-west-2.amazonaws.com/1.10.3/2018-06-05/amazon-eks-nodegroup.yaml
AutoScalingとかAMIとかVPCをとかサブネットとか設定
 //embedr.flickr.com/assets/client-code.js
作ったWorker Nodeをクラスタに参加させます。configuration mapをダウンロードして上記のCloudFormationのoutputで出てきたRoleのARNを記載します。
apiVersion: v1
kind: ConfigMap
metadata:
  name: aws-auth
  namespace: kube-system
data:
  mapRoles: |
    - rolearn:
      username: system:node:{{EC2PrivateDNSName}}
      groups:
        - system:bootstrappers
        - system:nodes
そして、kubectlにこの設定を食わせてやります。
$ kubectl apply -f aws-auth-cm.yaml
configmap "aws-auth" created
それっぽく見えています。
$ kubectl get nodes --watch
                         STATUS    ROLES     AGE       VERSION
ip-192-168-191-181.us-west-2.compute.internal   Ready         34s       v1.10.3
ip-192-168-206-53.us-west-2.compute.internal    Ready         38s       v1.10.3
ip-192-168-65-156.us-west-2.compute.internal    Ready         37s       v1.10.3
ip-192-168-206-53.us-west-2.compute.internal   Ready         41s       v1.10.3
ip-192-168-65-156.us-west-2.compute.internal   Ready         40s       v1.10.3
ip-192-168-191-181.us-west-2.compute.internal   Ready         40s       v1.10.3
ip-192-168-206-53.us-west-2.compute.internal   Ready         51s       v1.10.3
Guest Bookアプリケーション
詳細は↓こちらを御覧ください。
https://github.com/kubernetes/examples/blob/master/guestbook-go/README.md
kubectlに設定を食わせます。
$ kubectl apply -f https://raw.githubusercontent.com/kubernetes/kubernetes/v1.10.3/examples/guestbook-go/redis-master-controller.json
replicationcontroller "redis-master" created
redisのmasterとslave。
$ kubectl apply -f https://raw.githubusercontent.com/kubernetes/kubernetes/v1.10.3/examples/guestbook-go/redis-master-service.json
service "redis-master" created
$ kubectl apply -f https://raw.githubusercontent.com/kubernetes/kubernetes/v1.10.3/examples/guestbook-go/redis-slave-controller.json
replicationcontroller "redis-slave" created
$ kubectl apply -f https://raw.githubusercontent.com/kubernetes/kubernetes/v1.10.3/examples/guestbook-go/redis-slave-service.json
service "redis-slave" created
guestbook関連
$ kubectl apply -f https://raw.githubusercontent.com/kubernetes/kubernetes/v1.10.3/examples/guestbook-go/guestbook-controller.json
replicationcontroller "guestbook" created
$ kubectl apply -f https://raw.githubusercontent.com/kubernetes/kubernetes/v1.10.3/examples/guestbook-go/guestbook-service.json
service "guestbook" created
上記で立てたもの達
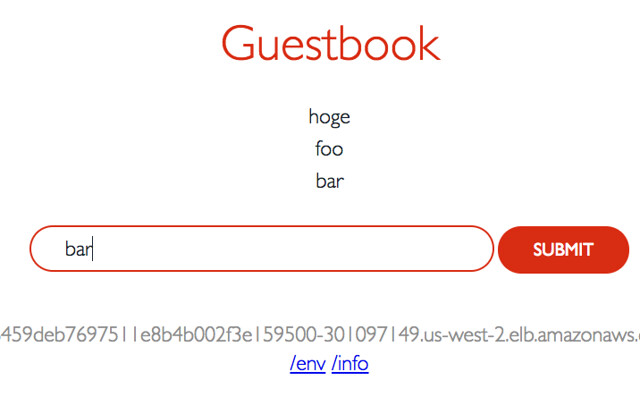
$ kubectl get services -o wide
NAME           TYPE           CLUSTER-IP       EXTERNAL-IP                                                              PORT(S)          AGE       SELECTOR
guestbook      LoadBalancer   10.100.111.14    a6459deb7697511e8b4b002f3e159500-301097149.us-west-2.elb.amazonaws.com   3000:30669/TCP   35s       app=guestbook
kubernetes     ClusterIP      10.100.0.1       <none>                                                                   443/TCP          1h        <none>
redis-master   ClusterIP      10.100.230.148   <none>                                                                   6379/TCP         2m        app=redis,role=master
redis-slave    ClusterIP      10.100.120.84    <none>                                                                   6379/TCP         1m        app=redis,role=slave
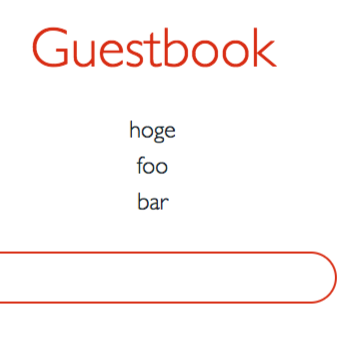
3000番ポートでリスンしているアプリにアクセスできました!
 //embedr.flickr.com/assets/client-code.js
書き込みもできました!!
 //embedr.flickr.com/assets/client-code.js
お掃除
Guestbookの削除
$ kubectl delete rc/redis-master rc/redis-slave rc/guestbook svc/redis-master svc/redis-slave svc/guestbook
replicationcontroller "redis-master" deleted
replicationcontroller "redis-slave" deleted
replicationcontroller "guestbook" deleted
service "redis-master" deleted
service "redis-slave" deleted
service "guestbook" deleted
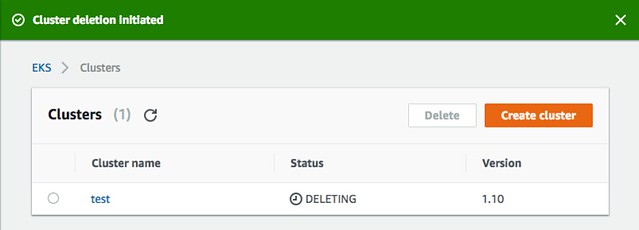
EKSクラスタの削除に関しては、EKSのドキュメントの Deleting a Cluster のページを参考に
 //embedr.flickr.com/assets/client-code.js
amzn_assoc_ad_type =”responsive_search_widget”; amzn_assoc_tracking_id =”diary045-22″; amzn_assoc_marketplace =”amazon”; amzn_assoc_region =”JP”; amzn_assoc_placement =””; amzn_assoc_search_type = “search_widget”;amzn_assoc_width =”auto”; amzn_assoc_height =”auto”; amzn_assoc_default_search_category =””; amzn_assoc_default_search_key =”kubernetes”;amzn_assoc_theme =”light”; amzn_assoc_bg_color =”FFFFFF”; //z-fe.amazon-adsystem.com/widgets/q?ServiceVersion=20070822&Operation=GetScript&ID=OneJS&WS=1&Marketplace=JP